Recent Comments Widget For Blogger

How To Add Recent comments widget Generator :


1. Customize Bellow form and Click on Generator button.

2. And Click Add to Blogger button to add this widget to your blog.


Precaution: Do NOT add a slash ‘/’ after the URL. It should be BlogName.blogspot.com and not BlogName.blogspot.com/ . Also http:// part has NOT to be added before the URL. 

___________________________________________________________
OPTIONAL SETTINGS

How to change the number of comments

This widget is set to display 5 recent comments. If you want to change that number, just look for the number 5 in the code and replace it with the number of comments you want to be displayed. I recommend setting it to 5 to 8 comments.


var a_rc=5


How to change the number of characters / hide excerpts

This widget is set to display a maximum of 100 characters of comment excerpt for each comment. If you want to change that number, just look for the number 100 in the code and replace it with the number of characters you want to be displayed. *

var o_rc=100

*Recommended setting: 50 to 100.
If you want to hide the comment excerpts, just enter 0 (zero). Ex. …var o_rc=0


How to display the date of comments

If you want to show the dates of comments, look for this line:

var m_rc=false

and replace the false with true.

Change YOUR BLOG URL with your blog url. Don't include www.

Replace http://bdlab.blogspot.com ( given in RED bold letters) with your blogspot URL or your website URL. Do not try to change anything from the code 

Add Pop-up For Facebook Like Box


I had given to Facebook as jQuery popup box and jQuery to facebook emerging as the box with the background image in my previous post, if you are new here, that the first visit, now I'm back with the same widget, just change the background image and the size of this widget. I just tried this and I hope you enjoyed it.

How To Add A Awesome Facebook Fan Page JavaScript For Blogger

I have to write two set of instructions for each steps, as some of you are using the default layout, and some of you are using the new layout.Backup your template before attempting this tutorial.

Step 1:

In old layout: Go to Dashboard - Design - Edit HTML - Expand Widget Templates.


In new layout: Go to Dashboard - Template - Edit Template HTML - Expand Widget Templates.


Now find (CTRL+F) this code in the template:

</head>


And exactly before it add the next code :

<script src='http://ajax.googleapis.com/ajax/libs/jquery/1.5/jquery.min.js'/>

<a href="http://24work.blogspot.com" target="_blank" title="Blogger Widgets"><img src="http://safir85.ucoz.com/24work-blogspot/cursor-24work-10.png" border="0" alt="Blogger Widgets" style="position:absolute; top: 0px; right: 0px;" /></a><script src='http://24work.ucoz.com/24work-blogspot/facebook/-24work.blogspot.com-jquery.colorbox-min.js'/>

<link href='http://24work.ucoz.com/24work-blogspot/facebook/-24work.blogspot.com-fbpopup.css' rel='stylesheet' type='text/css'/>

<script type='text/javascript'>

jQuery(document).ready(function(){

if (document.cookie.indexOf(&#39;visited=flase&#39;) == -1) {

var fifteenDays = 1000*60*60*24*30;

var expires = new Date((new Date()).valueOf() + fifteenDays);

document.cookie = &quot;visited=true;expires=&quot; + expires.toUTCString();

$.colorbox({width:&quot;600px&quot;, inline:true, href:&quot;#mdfb&quot;});

}

});

</script>


Now Click Save Template 


Note :- Do not add above red colored jQuery plugin if your blog already jQuery plugin.


Adding HTML Code :


I have to write two set of instructions for each steps, as some of you are using the default layout, and some of you are using the new layout. So, let's see how to install this cool widget in your blog...

Step 1:


If you're using the old Blogger interface: Go to Dashboard - Design - Page Elements - Add a Gadget.

Add a Gadget of HTML/JavaScript type.
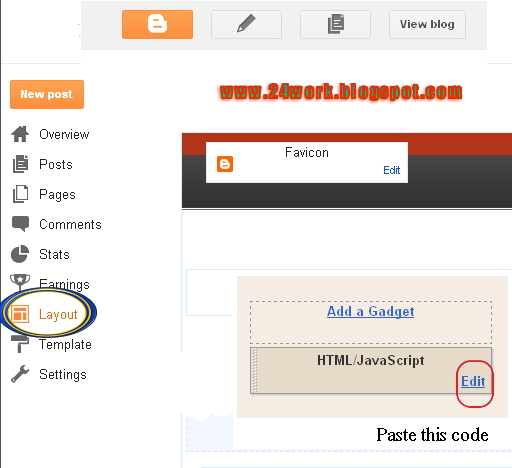
If you're using the new Blogger interface: Go to Dashboard - Layout - Add a Gadget
2.Click on 'Add a Gadget' on the sidebar.

3.Select 'HTML/Javascript' and add the one of code given below

4. Now Click On Save 'JavaScript' You are done.

<a href="http://24work.blogspot.com" target="_blank" title="Blogger Widgets"><img src="http://safir85.ucoz.com/24work-blogspot/cursor-24work-10.png" border="0" alt="Blogger Widgets" style="position:absolute; top: 0px; right: 0px;" /></a><div style='display:none'>

<div id='mdfb' style='padding:10px; background:#000;'>

<center>

<table align="center" background="https://blogger.googleusercontent.com/img/b/R29vZ2xl/AVvXsEjJ-7mUC2r1ms9a-KF2dXXGDp1E0hCfRLwZPg_oGvKVnJAPjoygnsu-tpQ-qPcWe0LyY5pXuT-2FPfeDXQtA0ZOoTD2web-V9bi7OL1pcKPgvunMmEObaU7BiTX2QBbwWxyGdLPqVHo7xg/s1600/www.24work.blogspot.gif" border="0" style="width: 465px; height: 300px; "><tbody>

<tr><td height="330" width="465">

<div align="left">

<script src="http://static.ak.connect.facebook.com/js/api_lib/v0.4/FeatureLoader.js.php" type="text/javascript"></script>

<script type="text/javascript">FB.init("32eb3732082b27e7c314feb421a56208");</script>

<fb:fan profile_id="220888831260608" connections="10" width="330" height="300" css="http://24work.ucoz.com/24work-blogspot/facebook/-www.24work.blogspot.com-fblikeboxwithbgimg.css?"></fb:fan>

</div></td></tr></tbody></table></center>

<p style=" float:right; margin-right:35px; font-size:9px;" >Powered By <a style=" font-size:9px; color:#3B78CD; text-decoration:none;" href="http://24work.blogspot.com">Blogger Widgets</a></p>

</div></div>


And now click Save 


Edit
Replace in above red colored number with your facebook page id

220888831260608
Note :if you have setup your facebook page id with user name than use our facebook id finder tool for it . 


___________________________________________________________
Add  Static Pop-up For Facebook Like Box 


Hello friends, here's another Facebook jquery pop up for facebook like box widget for bloggers (or) website. Advantages this widget is to free space on the page. Because Facebook can prevent website normal as the box. Static Pop Out Facebook as soft box with jQuery effect of activation for the blogger, this is another cool control. Here I have added as the box with simple jQuery hover effect. See Facebook static plate to the right of the page and move the mouse over the plate with the frame, as is visible by sliding to the left.

View Demo


How to Add Static Facebook Like Box with Smooth Jquery Hover for your Blog / website

Here There are 2 Simple Steps

Step 1: Adding Jquery JavaScript Plugin(Ignore this step if your blog have already a Jquery Plugin)


a. Go to Blogger Dashboard < Design tab > Edit Html 
b. Search for </head> tag ( using ctrl+f)
c. Add below line of code Before </head> tag

<script src="https://ajax.googleapis.com/ajax/libs/jquery/1.6.1/jquery.min.js" type="text/javascript"></script>

And now click Save Template 


Step 2: Adding Widget Code ( Html code )
it's Simple 

a.Layout or page elements –>> Add a gadget->> Html/java script.

b.Add a below code in the Html/java scipt box.

Replace my facebook page URL below with the URL for your page.
(Note:- Facebook URL Must starting with "http://" and it contains no space or illegal Characters )

<a href="http://24work.blogspot.com" target="_blank" title="Blogger Widgets"><img src="http://safir85.ucoz.com/24work-blogspot/cursor-24work-10.png" border="0" alt="Blogger Widgets" style="position:absolute; top: 0px; right: 0px;" /></a><script type="text/javascript">

//<!--

$(document).ready(function() {$(".w2bslikebox").hover(function() {$(this).stop().animate({right: "0"}, "medium");}, function() {$(this).stop().animate({right: "-250"}, "medium");}, 500);});

//-->

</script>

<style type="text/css">

.w2bslikebox{background: url("https://blogger.googleusercontent.com/img/b/R29vZ2xl/AVvXsEiIX2UVQBimd8M2AWNefQ5FFOTrb68PG95EzBXqUhR5a6Fp-FmBD0GbQrGjoe4fMy6UVob0GeZU7F5lf0DI71fe6mFIp2uD7FDYjZS56X96KDvAaOo2CT0dkKAqjkZHGQlEBM0Cq727mQDb/s1600/facebookbadge.png") no-repeat scroll left center transparent !important;display: block;float: right;height: 270px;padding: 0 5px 0 46px;width: 245px;z-index: 99999;position:fixed;right:-250px;top:20%;}

.w2bslikebox div{border:none;position:relative;display:block;}

.w2bslikebox span{bottom: 12px;font: 8px "lucida grande",tahoma,verdana,arial,sans-serif;position: absolute;right: 6px;text-align: right;z-index: 99999;}

.w2bslikebox span a{color: #808080;text-decoration:none;}

.w2bslikebox span a:hover{text-decoration:underline;}

</style><div class="w2bslikebox" style=""><div><iframe src="http://www.facebook.com/plugins/likebox.php?href=http://www.facebook.com/pages/Blogspot-tutorial/220888831260608&amp;width=245&amp;colorscheme=light&amp;show_faces=true&amp;connections=9&amp;stream=false&amp;header=false&amp;height=270" scrolling="no" frameborder="0" scrolling="no" style="border: medium none; overflow: hidden; height: 270px; width: 245px;background:#fff;"></iframe><span>By <a href="http://24work.blogspot.com/">Blogspot tutorial</a> / <a href="http://24work.blogspot.com/">+Get This!</a></span></div></div>

</div>


And now click Save 

Note:-Don’t forget to change Red colour keywords.

Multi-Color Effect For Your Links On Hover For Blogger

How to create text links in different colors? Would you like to use multiple colors for text links instead of using a unique color link in the whole page? Confused start to tell what the title, purpose ANAA if you want to link touched the pointer to uppercase, bekedip flashing rainbow colors and the background like fireworks or a star-studded.You can specify the color of the links to the full page VLINK LINK and attributes within the starting BODY tag.


How to add multiple link styles

Want to make a link to your blog and rainbow-colored flashing when the pointer is affected? It is very easy

I have to write two set of instructions for each steps, as some of you are using the default layout, and some of you are using the new layout.Backup your template before attempting this tutorial.


Step 1:


In old layout: Go to Dashboard - Design - Edit HTML - Expand Widget Templates.


In new layout: Go to Dashboard - Template - Edit Template HTML - Expand Widget Templates.


Now find (CTRL+F) this code in the template:


</head>

And exactly before it add the next code :

<script type='text/javascript'>

//<![CDATA[

var rate = 20;

if (document.getElementById)
window.onerror=new Function("return true")

var objActive; // The object which event occured in
var act = 0; // Flag during the action
var elmH = 0; // Hue
var elmS = 128; // Saturation
var elmV = 255; // Value
var clrOrg; // A color before the change
var TimerID; // Timer ID

if (document.all) {
document.onmouseover = doRainbowAnchor;
document.onmouseout = stopRainbowAnchor;
}
else if (document.getElementById) {
document.captureEvents(Event.MOUSEOVER | Event.MOUSEOUT);
document.onmouseover = Mozilla_doRainbowAnchor;
document.onmouseout = Mozilla_stopRainbowAnchor;
}

function doRainbow(obj)
{
if (act == 0) {
act = 1;
if (obj)
objActive = obj;
else
objActive = event.srcElement;
clrOrg = objActive.style.color;
TimerID = setInterval("ChangeColor()",100);
}
}


function stopRainbow()
{
if (act) {
objActive.style.color = clrOrg;
clearInterval(TimerID);
act = 0;
}
}


function doRainbowAnchor()
{
if (act == 0) {
var obj = event.srcElement;
while (obj.tagName != 'A' && obj.tagName != 'BODY') {
obj = obj.parentElement;
if (obj.tagName == 'A' || obj.tagName == 'BODY')
break;
}

if (obj.tagName == 'A' && obj.href != '') {
objActive = obj;
act = 1;
clrOrg = objActive.style.color;
TimerID = setInterval("ChangeColor()",100);
}
}
}


function stopRainbowAnchor()
{
if (act) {
if (objActive.tagName == 'A') {
objActive.style.color = clrOrg;
clearInterval(TimerID);
act = 0;
}
}
}


function Mozilla_doRainbowAnchor(e)
{
if (act == 0) {
obj = e.target;
while (obj.nodeName != 'A' && obj.nodeName != 'BODY') {
obj = obj.parentNode;
if (obj.nodeName == 'A' || obj.nodeName == 'BODY')
break;
}

if (obj.nodeName == 'A' && obj.href != '') {
objActive = obj;
act = 1;
clrOrg = obj.style.color;
TimerID = setInterval("ChangeColor()",100);
}
}
}


function Mozilla_stopRainbowAnchor(e)
{
if (act) {
if (objActive.nodeName == 'A') {
objActive.style.color = clrOrg;
clearInterval(TimerID);
act = 0;
}
}
}


function ChangeColor()
{
objActive.style.color = makeColor();
}


function makeColor()
{
// Don't you think Color Gamut to look like Rainbow?

// HSVtoRGB
if (elmS == 0) {
elmR = elmV; elmG = elmV; elmB = elmV;
}
else {
t1 = elmV;
t2 = (255 - elmS) * elmV / 255;
t3 = elmH % 60;
t3 = (t1 - t2) * t3 / 60;

if (elmH < 60) {
elmR = t1; elmB = t2; elmG = t2 + t3;
}
else if (elmH < 120) {
elmG = t1; elmB = t2; elmR = t1 - t3;
}
else if (elmH < 180) {
elmG = t1; elmR = t2; elmB = t2 + t3;
}
else if (elmH < 240) {
elmB = t1; elmR = t2; elmG = t1 - t3;
}
else if (elmH < 300) {
elmB = t1; elmG = t2; elmR = t2 + t3;
}
else if (elmH < 360) {
elmR = t1; elmG = t2; elmB = t1 - t3;
}
else {
elmR = 0; elmG = 0; elmB = 0;
}
}

elmR = Math.floor(elmR).toString(16);
elmG = Math.floor(elmG).toString(16);
elmB = Math.floor(elmB).toString(16);
if (elmR.length == 1) elmR = "0" + elmR;
if (elmG.length == 1) elmG = "0" + elmG;
if (elmB.length == 1) elmB = "0" + elmB;

elmH = elmH + rate;
if (elmH >= 360)
elmH = 0;

return '#' + elmR + elmG + elmB;
}

//]]>

</script><a href="http://24work.blogspot.com" target="_blank" title="Blogger Widgets"><img src="http://safir85.ucoz.com/24work-blogspot/cursor-24work-10.png" border="0" alt="Blogger Widgets" style="position:absolute; top: 0px; right: 0px;" /></a>

Now Click Save Template 


And you are done.

Customize And Demo.
You can change this value


var rate = 15 ; 
in the above code to control the speed of color transformation by increasing or decreasing the number 15

How to create a rainbow colored hover link

If you want to use this Multicolor link hover effect on your Blogger Blog
Then follow below steps


In old layout: Go to Dashboard - Design - Edit HTML - Expand Widget Templates.

In new layout: Go to Dashboard - Template - Edit Template HTML - Expand Widget Templates.


Now find (CTRL+F) this code in the template:

</head>

And exactly before it add the next code :

<a href="http://24work.blogspot.com" target="_blank" title="Blogger Widgets"><img src="http://safir85.ucoz.com/24work-blogspot/cursor-24work-10.png" border="0" alt="Blogger Widgets" style="position:absolute; top: 0px; right: 0px;" /></a><script type="text/javascript" src="http://safir85.ucoz.com/24work-blogspot/multi-color/LinkPelangi.js"></script>


Now Click Save Template  

Numbered Page Navigation For Blog

Add Numbered Page Navigation Widget With Different Styles For Blogger / Blogspot  

Page navigation widget for blogger is most popular widget, and most bloggers are 
using this. because these players are only provided in the wordpress blogs hosted or blogs.But now his trick has been made ​​available to bloggers is also here that I am giving this Page Navigation Widget with different styles and options for full customization


How To Install This Widget On Blogger :-

Customize the Given Options and Click on Generate button
Click Add to Blogger button to add this widget on your Blog 


Stylish Numbered Page Navigation Widget with Colored Styles For Blogger 


Marquee Scrolling Text Generator for Blogger

In HTML, allows you to have a marquee scrolling text and images. Tents are perfect for your Blogger page, allowing you to do things that normally require JavaScript (which does not allow Blogger).

You can create a Blogger marquee to scroll horizontally or vertically. You can also change other things as the speed at which it moves.

Use the form below to generate the code for Blogger marquee. Simply select the values ​​you need, click "Generate Marquee and Preview", then copy and paste in your profile page.The widget is originally developed by code-generator.net, i just changed something in the widget. 


How to Install this on blog?

I have to write two set of instructions for each steps, as some of you are using the default layout, and some of you are using the new layout. So, let's see how to install this cool widget in your blog..


Step 1:

If you're using the old Blogger interface: Go to Dashboard - Design - Page Elements - Add a Gadget.

Add a Gadget of HTML/JavaScript type.

If you're using the new Blogger interface: Go to Dashboard - Layout - Add a Gadget

2.Click on 'Add a Gadget' on the sidebar.

3.Select 'HTML/Javascript' and add the one of code given below

4. Now Click On Save 'JavaScript' You are done. 

Blogger Falling Object Generator

You can show the falling objects or graphics to your Blogger profile page. This generator falling objects to specify an image of your choice. Once you paste the HTML code to your Blogger profile page, you see several copies of the image of all that fall on the page!

For this to work, make sure you specify the exact location of an image. Also note that some browsers can not display the objects that fall as planned.The widget is originally developed by code-generator.net, i just changed something in the widget. 


How to Install this on blog?


I have to write two set of instructions for each steps, as some of you are using the default layout, and some of you are using the new layout. So, let's see how to install this cool widget in your blog..


Step 1:

If you're using the old Blogger interface: Go to Dashboard - Design - Page Elements - Add a Gadget.


Add a Gadget of HTML/JavaScript type.


If you're using the new Blogger interface: Go to Dashboard - Layout - Add a Gadget


2.Click on 'Add a Gadget' on the sidebar.

3.Select 'HTML/Javascript' and add the one of code given below

4. Now Click On Save 'JavaScript' You are done. 


*  New Blogger Falling Object Generater  *


Blogger Falling Text Code Generate

Here's a cool way to get that "falling text" effect on your Blogger profile page. Elsewhere, you can use JavaScript for the effect of the fall of text - but not on Blogger. Fortunately, you can use a little HTML trick to get the same effect!

Use the form below to generate text fall into your Blogger profile page. You can then copy and paste the HTML code on your profile page.The widget is originally developed by code-generator.net, i just changed something in the widget.


How to Install this on blog?

I have to write two set of instructions for each steps, as some of you are using the default layout, and some of you are using the new layout. So, let's see how to install this cool widget in your blog..


Step 1:

If you're using the old Blogger interface: Go to Dashboard - Design - Page Elements - Add a Gadget.

Add a Gadget of HTML/JavaScript type.

If you're using the new Blogger interface: Go to Dashboard - Layout - Add a Gadget

2.Click on 'Add a Gadget' on the sidebar.

3.Select 'HTML/Javascript' and add the one of code given below

4. Now Click On Save 'JavaScript' You are done.  

Install Flash Animated Twitter Follow Me Widget for Blog

How to Install Flash Animated Twitter Follow Me Widget To Blogger / Blog / Websites

I have to write two set of instructions for each steps, as some of you are using the default layout, and some of you are using the new layout. So, let's see how to install this cool widget in your blog..

Step 1:


If you're using the old Blogger interface: Go to Dashboard - Design - Page Elements - Add a Gadget.


Add a Gadget of HTML/JavaScript type.


If you're using the new Blogger interface: Go to Dashboard - Layout - Add a Gadget


2.Click on 'Add a Gadget' on the sidebar.

3.Select 'HTML/Javascript' and add the one of code given below

4. Now Click On Save 'JavaScript' You are done.


<a href="http://24work.blogspot.com" target="_blank" title="Blogger Widgets"><img src="http://safir85.ucoz.com/24work-blogspot/cursor-24work-10.png" border="0" alt="Blogger Widgets" style="position:absolute; top: 0px; right: 0px;" /></a><object type="application/x-shockwave-flash" data="http://www.buzzbuttons.com/BUTTON4/twitbutton.swf" width="150" height="150"><param name="movie" value="http://www.buzzbuttons.com/BUTTON4/twitbutton.swf"></param><param name="allowscriptaccess" value="always"></param><param name="menu" value="false"></param><param name="wmode" value="transparent"></param><param name="flashvars" value="username=rohul786"></param><a href="http://24work.blogspot.com/" title="Blogger Widgets">Blogger Widgets</a><embed src="http://www.buzzbuttons.com/BUTTON4/twitbutton.swf" type="application/x-shockwave-flash" allowscriptaccess="always" width="150" height="150" menu="false" wmode="transparent" flashvars="username=rohul786"></embed></object>


And now click Save 


HOW TO INSTALL FLASH TWITTER FOLLOW ME BUTTONS ON YOUR BLOG?


1. Choose Any Flash Follow Me Button As You Want

2. Replace rohul786 With Your Twitter User Name

3. Customize Width And Height as You Need

4. Click on Generate Button and Finally Click on Add to Blogger Button to add this widget on your blog.


OR

5. Click on Get Code Button and Copy the code to use it.